Showing posts with label things I've made. Show all posts

Tuesday, January 22, 2019

Sourdough Bread

I've never been a bread maker. My mom used to bake yummy, homemade bread. It was eaten more as a treat though, we used boughten bread for most occasions. I married a man who isn't crazy about bread, so it never became a priority to learn the art. My children, on the other hand, looove homemade bread. I've tried my hand at it a few times over the years but mostly have learned to make dinner rolls, not loaves of bread.

Enter a daughter who likes to try things - particularly unusual and healthy things; things that require research and extra effort.

I confess I rolled my eyes when Jasmine got it in her head to try to make her own sourdough starter. It sounded way too complicated and time consuming for me. I made it perfectly clear that this was her project, not mine.

Well, Jasmine being Jasmine, she read and she researched and she tried recipes. There were some flops and some interesting baked goods but she finally got a starter strong enough to make a delicious loaf of bread!

First loaf

And guess who was hooked? Yeah. The skeptical mother.

If you're looking for sourdough info and recipes, Home Joys is a great place to check out. Her bread recipe is the only one we use and when there's none available for my morning toast, it's me who says "Get your starter out Jasmine!" It's me who makes sure it gets fed and it's me (usually) who mixes and stretches and bakes the bread and me who eats it every morning... along with several others...

My normal breakfast -- 
Hot drink, yogurt with granola and maybe fruit, and sourdough toast. 
Right now really all I'm looking at is the green in that picture though.........

Here is the recipe:

2 C active starter
1 C milk
1/2 C water
1/4 C oil or melted butter
1/4 C honey
2 1/2 C whole wheat flour
3 C white flour
3 tsp salt

Mix all ingredients except salt for 2-3 minutes.  Allow dough to rest for about 20 minutes.


 Add salt and knead for about 5 minutes.


Place in oiled bowl and allow to rise 3-4 hours. (Optional: every hour stretch your dough and return to bowl. I've done this the last several times and I think it makes a nicer rise but it may have been coincidence.)


Divide dough into 2 pieces; shape into loaves and place in greased pans. Spray with oil and cover with plastic to keep from drying out. Allow to rise 2-3 hours.


When dough has risen, slash top of the loaf (Optional. I don't usually slash it for fear of making it fall.)

Bake at 400 degrees 25-30 minutes.


Enjoy! My favorite way to eat it is toasted and spread with butter or used for a grilled cheese sandwich -- sprinkle the buttered side with italian seasoning and garlic salt before grilling for the best grilled cheese ever.

    * * * * * * * * *

You know my writing motivation is still at a dangerous low when I start posting recipes..... just saying......

Tuesday, September 11, 2018

"Car Pants"


Years and years ago, back when Farm & Ranch Living magazine was a thing (Is it still a thing?) Anyway, years ago I remember reading one of the 'week in a life' journals in Farm & Ranch Living about a young family with four or five little boys. I don't remember much about the family or where they lived or what they did. I do remember they had the cutest built in bunk beds in their upstairs bedrooms, but mostly I remember their pants patches.

As you can imagine, a mother of boys living on a farm would see lots of pants with holes. Well, this particular mother had a very creative method for patching pants. Instead of your usual squares, she patched them by cutting out shapes of animals from iron on patches and sewing them over the holes.

I'm not sure why that idea stuck in my mind? I think it was the fact that she turned a dreaded task into something a little more fun simply by using a little creativity. Instead of old, ugly looking patches, she now had cute, whimsical ones that delighted her little boys. I remembered all this the other day when I was sewing car patches.

You see, when Isaac was little, I took the memory of that creative mother, gave it my own twist, and used car patches to patch his pants. I still do it with Charles and both of them have always been delighted to wear what Charles calls "car pants". I thought you might like to see the process.


Charles' poor pants were in sad need of repair, so I decided to tackle them all at once.


I got out my iron on patches and my little car patterns that I free handed once upon a time. Since the point is the cute patch, it doesn't really matter if the color matches the pants perfectly.


Next, I traced three cars -
two big and one small,
according to the size of the holes. 


I cut them out...


And ironed them over the holes.


I've tried leaving it at that, 
but they tend to come loose in a hurry. 


So, last but not least,
I hand stitch around them
with an applique stitch. I've also
used a zig zag stitch and 
done it on the sewing machine. 


And there you have it!

Charles wasn't at home when I sewed these patches. I purposely laid them out so he would see them and I wish you could have seen his face -- "Mom! Three pairs of car pants!!"


Patched pants were never so fun ☺


Wednesday, September 5, 2018

Show And Tell

At the church where I grew up, the first Thursday of the month was The Quilting. On that day, someone opens their home for church and neighbor ladies to gather and spend time together quilting, eating a delicious potluck meal, visiting, laughing and sharing together. One of the fun things is a Show and Tell time.

I miss The Quilting.

Today let's pretend you're all gathered here in my house and it's show and tell time. We may have to set up a few folding chairs and squeeze together on the couch, but we'll manage. At The Quilting there's always room for one more!

I've got three things I want to show you today. If it were real life show and tell time, I'd probably try to choose just one so I wouldn't take up too much time. But this is pretend, so I'll take as much time as I like.

Do you remember a very long time ago, when I said I was going to make quilts for my girl's beds? They are finally done. We won't go into any details about why they took so long.


The original plan was to make the whole quilt with the chevron pattern. Well. It didn't take me long to figure out that if I actually wanted the quilts done so the girls could use them before they left home, I needed a different plan. It was my sister who suggested using a couple rows of chevron and a solid. I really like the way they turned out and it was so much more doable!


The girls each chose their grey material so each quilt would have a personal touch.


      *******
My next show and tell has a bit of a story behind it. Early this spring, through two different giveaways, I somehow managed to score a total of five dahlia tubers. Jasmine and I were beyond thrilled, as we've been crushing over Root Design Co's dahlias for the past year or so.

We planted them carefully, desperately hoping our amateur growing skills would do them no harm. Alas, it rained and it rained and the place we had chosen for planting turned to a mud hole. As dahlias prefer direct sun, this was not a good thing at all. Suffice it to say, after our rescue efforts, we ended up with one thriving plant.

Sad, sad.

But the plucky little plant grew straight and tall and at long last developed buds a few weeks ago. With baited breath we've watched them slowly swell and open.

My daily progress report...

Perfection. 

    *******
Last but not least is, perhaps, my favorite show and tell of all. I got the idea somewhere that I wanted a picture to put behind my old window. Then, I had the brilliant brainstorm that Jasmine could paint something for me!


With a cheap piece of poster board and Root Design Co as her inspiration...


She obliged with a fabulous watercolor bouquet. I absolutely love it!

And that's all I have. Thanks for coming! We have a little time left, what would you like to show or tell me? I'd love to hear...

Friday, April 27, 2018

Two Breakfasts For One

When the rest are at work and school, and there's only Charles and I at home, I am notorious for not eating. I don't enjoy cooking and Charles and I both have enough Gingerich genetics to easily do without or go with very little. It's not really the most healthy habit, because then we end up being starved at odd hours when it's easy to grab some quick snack to tide us over until the next meal.

Recently I've fixed myself two yummy breakfasts that I sort of made up and I got the notion to share them with you this morning. All of you homeschooling mommies or those with a busy row of toddlers or those heroes who get up and fix their school children a big breakfast can feel free to roll your eyes and skip over the bizarre idea of making a breakfast just for mom. Someday you might be odd, like me.

The first one is this....


No measurements here, of course. I just heated butter in my iron skillet, threw in a couple handfuls of frozen hashbrowns, sprinkled them with a few seasonings and fried them a couple minutes. Next I added some spinach leaves to the butter on the side, sauted it a bit, then mixed it into my tators. Last, I cracked two eggs into the empty side of the pan and fried them to taste. Two pieces of toast on the side, and there you have it!

It looked pretty and it tasted delicious too.... Except, that particular day I ended up getting two phone calls before I got a bite, so it was a little on the cold side.

The second one is a twist on creamed eggs over toast...


My mother-in-law is a native Virginian and grew up on cornmeal gravy. I'd never heard of it either, but I love it! It's basically the same idea as brown flour gravy but you use white cornmeal instead of flour. For my personal plate full, I put several tablespoons of vegetable oil in my little pan, added about an eighth cup of white cornmeal (I didn't measure but that's probably close) and salt and pepper to taste. I stirred that together with a fork and browned it a bit, then gradually added milk and whisked and cooked until it was gravy consistency.

I put two pieces of toast on my plate, cut up two leftover hard-boiled eggs I had in the fridge and sprinkled them over the toast, then poured the gravy over top. Yum.

I didn't bother to share either of these creations with Charles; he wouldn't have wanted them anyway! It's kinda fun sometimes to do something a little extra just for oneself.

Got any little extras you like?

        ----------------------------------------------

I wanted to thank all of you for your encouragement after my last post. I got feedback from a number of you, all encouraging and blessing, and it meant so much! I'm finding out that there are lots of people who have been in the ministry of foster care over the years and it's so good to hear their input and stories. Thank you.

I'm sure you'll hear more about this subject from me down the road. Sometime I'll tell you about some people in the foster care trenches that I have greatly admired who probably planted more seeds in my heart than I'll ever know. Also, a few of you thought it would be interesting to hear more about "Module VIII"... I'll keep it in mind.

Many blessings on your weekend!

Thursday, August 31, 2017

A Recipe For Lunch Packing Moms

I don't really enjoy cooking and my blog is anything but a food blog but occasionally circumstances call for desperate measures. Back to school and packing four lunches a day is cause for talking about food and sharing recipes! Today I am shamelessly copying a fellow blogger and passing on a great lunch box idea for you all. If you want professional pictures, check out her post about packing lunches. If all you want is the recipe because you're desperate for something quick you can grab out of the freezer in the rush of a school morning, read on.


These things don't have an official name. I'm calling them 'Pizza Pockets' but you can take them, customize them, and give them your own name!

I took our favorite stromboli dough recipe:

1 T yeast
1 C warm water
1 tsp sugar
1 1/2 tsp salt
1/4 C vegetable oil
3 C flour

Dissolve yeast and sugar in warm water, then add other ingredients. Let rise five minutes.


(I love that it only has to rise for five minutes - anything quicker is better when you don't really like to cook!)


I doubled the recipe and rolled half of it out in a big rectangle. Next I cut it into twenty square-ish squares with a pizza cutter.


Since I have about as many preferences for ingredients as I do children (you probably don't have this problem, so no need to dwell on my issues), I did some squares with cheddar cheese and ham, some with cheddar cheese and pepperoni, and some with mozzarella, ham and pepperoni. You could add whatever you like!

(Have fun trying to keep the different kinds separated once they're closed. I lined them up on the pans carefully and used a toothpick to mark my row.)

Then I folded the corners in and pinched them closed and baked them at 350 for 20-25 minutes. I repeated the process with the second half of the dough giving me forty cute, little lunch life-savers.


I melted some butter and added a little garlic salt and oregano to it and brushed the tops when they came out of the oven. They looked so irresistible that Charles and I had a couple for lunch with pizza sauce for dipping. Yum.


After they cooled, I bagged them up in labeled bags (God forbid the pepperoni hater should end up with the ham hater's Pizza Pocket!) and stuck them away in the freezer.


I've been feeling like super mom all day!


Monday, October 3, 2016

The Full Run Down On My Baby Quilt Project

These days you can find a tutorial on pretty much anything. Who needs to ask grandma how to raise potatoes or patch jeans when you've got Google right at your fingertips? I could write an article on how social media is eliminating our need for relationships and, incidentally, I would be preaching to myself. To be honest though, I enjoy tutorials. Maybe it has something to do with the way I learn, I don't know, but I said I was going to give you the full run down on my project so here we go.


I think I told you how at the beginning of summer I had this big idea that I should piece quilts for the girl's beds? We actually went and chose fabric for Jasmine's quilt and one day after school started I sat down and marked off all the blocks. That's when another bright idea struck: wouldn't it be neat to make a baby quilt out of the leftover fabric to sell at our school auction?

I'll just tell you this right now, I get a lot of ideas but the amount of ideas that make it to completion is quite a bit smaller!

I confess, I really expected this idea to join the list of incompleted ones. For one thing, I've never pieced a quilt except for the simple nine patches I learned to sew on. And, since my mom didn't like to piece quilts, I kind of figured I might not enjoy it either. But I did it! And, biggest surprise of all - I enjoyed it.

Google was my friend for this project. If you want information on figuring sizes for the blocks and all the technical things, I found most of my information here and here. I was intrigued with the methods for sewing blocks together but maybe that's just because I knew so little about how you go about piecing quilts.

Before you start reading the rest of this, keep in mind that this was not a project I did in a day or even a week! I did a little at a time, pulling my stuff out when I'd finished my daily chores that I required myself to do first, doing the next step, then tucking it all away again.

I did things the old fashioned way. I made a square the size I wanted out of cardboard and used it for a pattern, traced all the blocks off and then cut them with good ol scissors. I'm thinking of investing in easier methods, maybe someone can give me a recommendation?


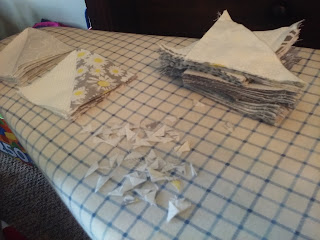
Once I had all my blocks cut out in nice, pretty stacks, I paired each colored square up with a white one and marked a line from corner to corner.


My next project was to sew a 1/4 inch seam allowance on each side of all those lines.


Once that was done, I cut across all those diagonal lines. This left me with stacks of squares made out of a triangle of white and a triangle of grey or yellow.


Then I ironed. Put my ironing board down low, grabbed a chair, and ironed. My mom always said to iron your seams toward the darker fabric, so that's what I did.


I couldn't believe how much fun I was having. I felt sort of old lady-ish but maybe that's because I'm heading for forty and all but one of my children are in school and it's a whole new stage of life.

My next project was sewing all the yellow and white squares together and all the grey and white squares together.


Half of them needed to be sewed together pointing this way...


And half of them needed to be sewed together pointing this way. (The daisy fabric is in the grey stack in case you were wondering)

I wanted to use my fabric randomly but I did try to put a 'light' and a 'dark' of the yellows and greys together when I sewed these pairs. After those were all sewed it was time to iron again.

Now it was time to sew my pairs together to make blocks. This was fun because you could begin to see how the quilt would actually look.


More ironing once the blocks were sewed together. I used a little spray bottle with water as I ironed and my side kick thought that was fun ☺


Then came the fun of laying the blocks all out in rows and sewing them together. I tried to make sure no alike fabric was right beside each other but otherwise I didn't keep any sort of pattern.


It was fun, until I discovered I hadn't made enough blocks to make it big enough for a baby quilt! I almost changed my mind and turned it into a wall hanging but I ended up dragging the material back out and making some more blocks.

Once my rows were sewed together (and ironed once again), came the job of sewing the rows together and trying to line up all those seams.


It's not perfect but it actually turned out pretty well. Once more it was time for the iron and spray bottle and then came the part that I still think is the most fun - quilting it.


I used a big hoop since I don't have a quilt frame nor the space for one.


I had lots of help!


And last of all, since Mom wasn't here to call, my sister and Google helped me with the binding process. I'd helped with the hand sewing on the binding before but never actually sewed the binding into the quilt. I understand why my mom tried to not have to do that job when she quilted for people! Doing a baby quilt is one thing, a full sized quilt would be another story.


There it is, all done.


Mom always liked to see the back of a quilt and so do I!

And there you have it. Maybe when I'm truly an old lady I'll be the kind who makes quilts for all their children and grandchildren but I'm promising nothing.