

I think I told you how at the beginning of summer I had this big idea that I should piece quilts for the girl's beds? We actually went and chose fabric for Jasmine's quilt and one day after school started I sat down and marked off all the blocks. That's when another bright idea struck: wouldn't it be neat to make a baby quilt out of the leftover fabric to sell at our school auction?
I'll just tell you this right now, I get a lot of ideas but the amount of ideas that make it to completion is quite a bit smaller!
I confess, I really expected this idea to join the list of incompleted ones. For one thing, I've never pieced a quilt except for the simple nine patches I learned to sew on. And, since my mom didn't like to piece quilts, I kind of figured I might not enjoy it either. But I did it! And, biggest surprise of all - I enjoyed it.
Google was my friend for this project. If you want information on figuring sizes for the blocks and all the technical things, I found most of my information here and here. I was intrigued with the methods for sewing blocks together but maybe that's just because I knew so little about how you go about piecing quilts.
Before you start reading the rest of this, keep in mind that this was not a project I did in a day or even a week! I did a little at a time, pulling my stuff out when I'd finished my daily chores that I required myself to do first, doing the next step, then tucking it all away again.
I did things the old fashioned way. I made a square the size I wanted out of cardboard and used it for a pattern, traced all the blocks off and then cut them with good ol scissors. I'm thinking of investing in easier methods, maybe someone can give me a recommendation?

Once I had all my blocks cut out in nice, pretty stacks, I paired each colored square up with a white one and marked a line from corner to corner.


My next project was to sew a 1/4 inch seam allowance on each side of all those lines.


Once that was done, I cut across all those diagonal lines. This left me with stacks of squares made out of a triangle of white and a triangle of grey or yellow.

Then I ironed. Put my ironing board down low, grabbed a chair, and ironed. My mom always said to iron your seams toward the darker fabric, so that's what I did.
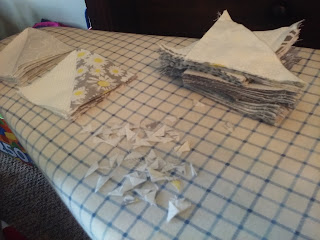

I couldn't believe how much fun I was having. I felt sort of old lady-ish but maybe that's because I'm heading for forty and all but one of my children are in school and it's a whole new stage of life.
My next project was sewing all the yellow and white squares together and all the grey and white squares together.


I wanted to use my fabric randomly but I did try to put a 'light' and a 'dark' of the yellows and greys together when I sewed these pairs. After those were all sewed it was time to iron again.
Now it was time to sew my pairs together to make blocks. This was fun because you could begin to see how the quilt would actually look.

More ironing once the blocks were sewed together. I used a little spray bottle with water as I ironed and my side kick thought that was fun ☺

Then came the fun of laying the blocks all out in rows and sewing them together. I tried to make sure no alike fabric was right beside each other but otherwise I didn't keep any sort of pattern.

It was fun, until I discovered I hadn't made enough blocks to make it big enough for a baby quilt! I almost changed my mind and turned it into a wall hanging but I ended up dragging the material back out and making some more blocks.
Once my rows were sewed together (and ironed once again), came the job of sewing the rows together and trying to line up all those seams.

It's not perfect but it actually turned out pretty well. Once more it was time for the iron and spray bottle and then came the part that I still think is the most fun - quilting it.

I used a big hoop since I don't have a quilt frame nor the space for one.


And last of all, since Mom wasn't here to call, my sister and Google helped me with the binding process. I'd helped with the hand sewing on the binding before but never actually sewed the binding into the quilt. I understand why my mom tried to not have to do that job when she quilted for people! Doing a baby quilt is one thing, a full sized quilt would be another story.


Mom always liked to see the back of a quilt and so do I!
And there you have it. Maybe when I'm truly an old lady I'll be the kind who makes quilts for all their children and grandchildren but I'm promising nothing.
Before you start reading the rest of this, keep in mind that this was not a project I did in a day or even a week! I did a little at a time, pulling my stuff out when I'd finished my daily chores that I required myself to do first, doing the next step, then tucking it all away again.
I did things the old fashioned way. I made a square the size I wanted out of cardboard and used it for a pattern, traced all the blocks off and then cut them with good ol scissors. I'm thinking of investing in easier methods, maybe someone can give me a recommendation?

Once I had all my blocks cut out in nice, pretty stacks, I paired each colored square up with a white one and marked a line from corner to corner.


My next project was to sew a 1/4 inch seam allowance on each side of all those lines.


Once that was done, I cut across all those diagonal lines. This left me with stacks of squares made out of a triangle of white and a triangle of grey or yellow.

Then I ironed. Put my ironing board down low, grabbed a chair, and ironed. My mom always said to iron your seams toward the darker fabric, so that's what I did.


I couldn't believe how much fun I was having. I felt sort of old lady-ish but maybe that's because I'm heading for forty and all but one of my children are in school and it's a whole new stage of life.
My next project was sewing all the yellow and white squares together and all the grey and white squares together.

Half of them needed to be sewed together pointing this way...

And half of them needed to be sewed together pointing this way. (The daisy fabric is in the grey stack in case you were wondering)
I wanted to use my fabric randomly but I did try to put a 'light' and a 'dark' of the yellows and greys together when I sewed these pairs. After those were all sewed it was time to iron again.
Now it was time to sew my pairs together to make blocks. This was fun because you could begin to see how the quilt would actually look.

More ironing once the blocks were sewed together. I used a little spray bottle with water as I ironed and my side kick thought that was fun ☺

Then came the fun of laying the blocks all out in rows and sewing them together. I tried to make sure no alike fabric was right beside each other but otherwise I didn't keep any sort of pattern.

It was fun, until I discovered I hadn't made enough blocks to make it big enough for a baby quilt! I almost changed my mind and turned it into a wall hanging but I ended up dragging the material back out and making some more blocks.
Once my rows were sewed together (and ironed once again), came the job of sewing the rows together and trying to line up all those seams.

It's not perfect but it actually turned out pretty well. Once more it was time for the iron and spray bottle and then came the part that I still think is the most fun - quilting it.

I used a big hoop since I don't have a quilt frame nor the space for one.

I had lots of help!

And last of all, since Mom wasn't here to call, my sister and Google helped me with the binding process. I'd helped with the hand sewing on the binding before but never actually sewed the binding into the quilt. I understand why my mom tried to not have to do that job when she quilted for people! Doing a baby quilt is one thing, a full sized quilt would be another story.

There it is, all done.

Mom always liked to see the back of a quilt and so do I!
And there you have it. Maybe when I'm truly an old lady I'll be the kind who makes quilts for all their children and grandchildren but I'm promising nothing.


